SSH using Chrome Secure Shell app with SSH identity (private key and public key)
It's something I keep using a lot!
The Chrome's Secure Shell app is wonderful and is handy for people who want to use the chrome's tab for connecting to the remote server.
So here it is:
In case you want to Reset the known_hosts then do the following:
That's it.
You are good to go.
The Chrome's Secure Shell app is wonderful and is handy for people who want to use the chrome's tab for connecting to the remote server.
So here it is:
- Install Secure Shell from the chrome web app store.
-
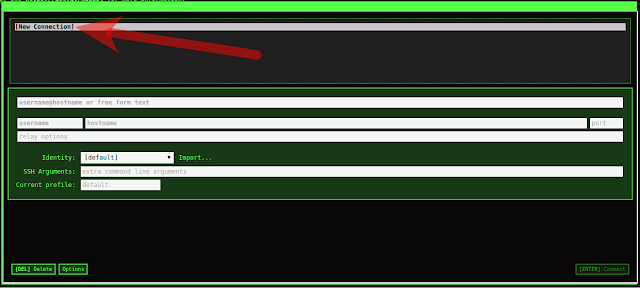
Once added, open the app and select "[New Connection]":
-
Enter the details:

-
Remember to change the permission of the pem file, using the following command:chmod 400 mykey.pem
-
Generate the public key from the private key:ssh-keygen -y -f mykey.pem > mykey.pub
-
RENAME the private key (.pem) file to remove the extension of the private key (The most Important :P). Otherwise, the files won't be accepted by the plugin:mv mykey.pem mykey
- Click on the "Import" button beside the Identity in that screen and select both the files:


In case you want to Reset the known_hosts then do the following:
- Open the Developers Tools
- Go to Console and type: term_.command.removeAllKnownHosts()
That's it.
You are good to go.
This is my usual way to connect to Amazon EC2 instances.
In case you face any difficulties, do feel free to add a comment, or even recommend any changes. :)
This is exactly what I was looking for. It wasn't working for me because I was only selecting the private key.
ReplyDeleteThanks a lot!
You are welcome :)
DeleteSsh Using Chrome Secure Shell App With Ssh Identity (Private Key And Public Key) >>>>> Download Now
Delete>>>>> Download Full
Ssh Using Chrome Secure Shell App With Ssh Identity (Private Key And Public Key) >>>>> Download LINK
>>>>> Download Now
Ssh Using Chrome Secure Shell App With Ssh Identity (Private Key And Public Key) >>>>> Download Full
>>>>> Download LINK jy
Thank You! I had no idea I had to remove the .pem
ReplyDeleteYou saved me a lot of frustration.
You are welcome :)
DeleteI am having a problem connecting to my EC2 instance using the SSH extension in Chrome, I can not import my private key. I do not have a public key, and I tried to use the ssh keygen command to create a public key and that did not work. I removed the extension on the file...as a matter of fact I copied the data that makes the private key and create a new file in Notepad and pasted that data into the new file and made sure that the file did not have a extension. What am I doing wrong ? Thanks in advance !
ReplyDeleteHi,
DeleteYou need to remove extension of the private key file once you generate the public key. As well ensure your file permission is set to 400 (Only file owner can read it)
Regards,
Nagaraj
I have followed all your steps but still my SSH connection is refused. Please advice me
ReplyDeleteLoading NaCl plugin... done.
Connecting to ec2-user@3.8.125.80...
ssh: connect to host 3.8.125.80 port 22: Connection refused
NaCl plugin exited with status code 255.
Are you sure the machine is reachable with port 22 being open?
DeleteCheck whether the port is open for that machine using:
telnet 3.8.125.80 22
Does the Public Key have to be saved as a .pub file? This is saving as a Microsoft Publisher and prevents my access. Is there a workaround?
ReplyDeleteAs much I can state, the .pub file a way to tell it's public key in case of SSH console. What you can try once is naming the .pub as some other extension, like .pubk and try to import. If that does not work out, then what you can do is for a brief time uninstall Microsoft Publisher and re-install once done.
DeleteThanks.. that really helped. Cheers.
ReplyDeleteQuick Question: I'd like to start a new EC2 Instance, but also like to start over and generate and use a totally different key pair how would I go about doing that? I attempted to do this, but the Shell App will not allow a new upload of the new files. It's simply the old key and [default] in the dropdown menu of the Identity Field
ReplyDeleteI saw at the bottom of the blog post you mention a way to reset the app, but where are the Developer Tools located? I don't see that in the options section of the shell app.
Thank you greatly!
@Schuyler, the Developer Tools are accessible as follows: https://developers.google.com/web/tools/chrome-devtools/open
DeleteThanks for sharing information
ReplyDeletereact js training in hyderabad
Hi .I would just like to post a question here:
ReplyDeleteWhy are we exactly removing the private key extension(.pem) before importing it in SSH console. As far as I understand, private key is private and should not be shared with the SSH client .But we are uploading both the public key and the private(after removing the extension).Not sure why? Thanks in advance
Hi,
DeleteJust to clarify there is no need of removing the private key.
Regards
I'm not even getting the identity key in my files.
ReplyDeleteThis doesn't even make any sense... what .pem file? Where is it stored? You mentioned nothing about it other than its name, which doesn't happen to exist on my computer
ReplyDeleteIs this a linux only thing?
DeleteI figured out a way to do this and am connecting with a public/priv keypair generated on the linux server and copied over... I still have no idea what this article is talking about with the .pem file.
DeleteI just logged into the linux server, went to a random directory and ran
`ssh-keygen -t rsa -f ./id_rsa -q -N "" && cat ./id_rsa.pub >> $HOME/authorized_keys`
which generates both the private and public key files and adds the public key to the authorized_keys file. Then copied them to a random directory on windows using winscp, and deleted them from server. Finally I logged out of the linux server, and in the secure shell app clicked import and selected both keys. Immediately was able to log in without password prompt, no hastle or dealing with mystery .pem files.
correction: command is
Delete`ssh-keygen -t rsa -f ./id_rsa -q -N "" && cat ./id_rsa.pub >> $HOME/.ssh/authorized_keys`
This is linux only my friend.
DeleteIt is really helpful article please read it too my blog Best antivirus for Chromebook.
ReplyDelete
ReplyDeleteSuch a nice blog Thanks for sharing information. It is really helpful article please read it to my blog Best antivirus for Chromebook.
If you are facing problem for Amazon Kindle App Not Working from chrome then visits our website or call us our toll free number +1(866)379-1999
ReplyDeleteHi Nagaraj,
ReplyDeletePls tell me if I am connecting thru Putty then also it is required to use ssh -i "PEM file name" ec2-user@ec2-99-999-99-999.ap-south-1.compute.amazonaws.com?
Thanks/Jay
Sorry Jay, not sure about putty.
Deletenoticed a bug where it wouldn't take my credentials unless i added an empty line to the bottom of each file.. Might help if someone else is having the same issue.
ReplyDeletethis was my issue. thanks!
DeleteAre the two files moved to ~/.ssh on the Chromebook? If so, how can I access them in the future?
ReplyDeleteSsh Using Chrome Secure Shell App With Ssh Identity (Private Key And Public Key) >>>>> Download Now
ReplyDelete>>>>> Download Full
Ssh Using Chrome Secure Shell App With Ssh Identity (Private Key And Public Key) >>>>> Download LINK
>>>>> Download Now
Ssh Using Chrome Secure Shell App With Ssh Identity (Private Key And Public Key) >>>>> Download Full
>>>>> Download LINK YB